Are you ready to simplify your Adobe Premiere Pro workflow and streamline the way your team collaborates, both locally and remotely?
In this post, we're unveiling seven practical tips for integrating creative.space into your Premiere Pro workflows, each designed to bring you closer to a seamless post-production experience. You'll learn how to optimize your shared storage setup, foster smooth collaboration among your team, and efficiently manage your creative assets. We’ll also demystify the process of working with Productions in Premiere Pro. With these tips, your team's productivity and harmony will reach new heights, no matter where you're located.
Ready to take this leap towards seamless creative workflows? Let's dive right in.
Tip 1: Store Your Assets in Shared Spaces
First things first: once you've got creative.space, you can easily connect your server and mount shared spaces to your OS using our Desktop App. What does this mean? Well, welcome to the wonderful world of network-attached storage (NAS)! Unlike traditional local storage, where files are stored directly on the device you're using, NAS systems are flexible, scalable, and accessible to everyone on your network. And with creative.space, this means you and your team can access the same media files in real-time, a game changer for collaboration!
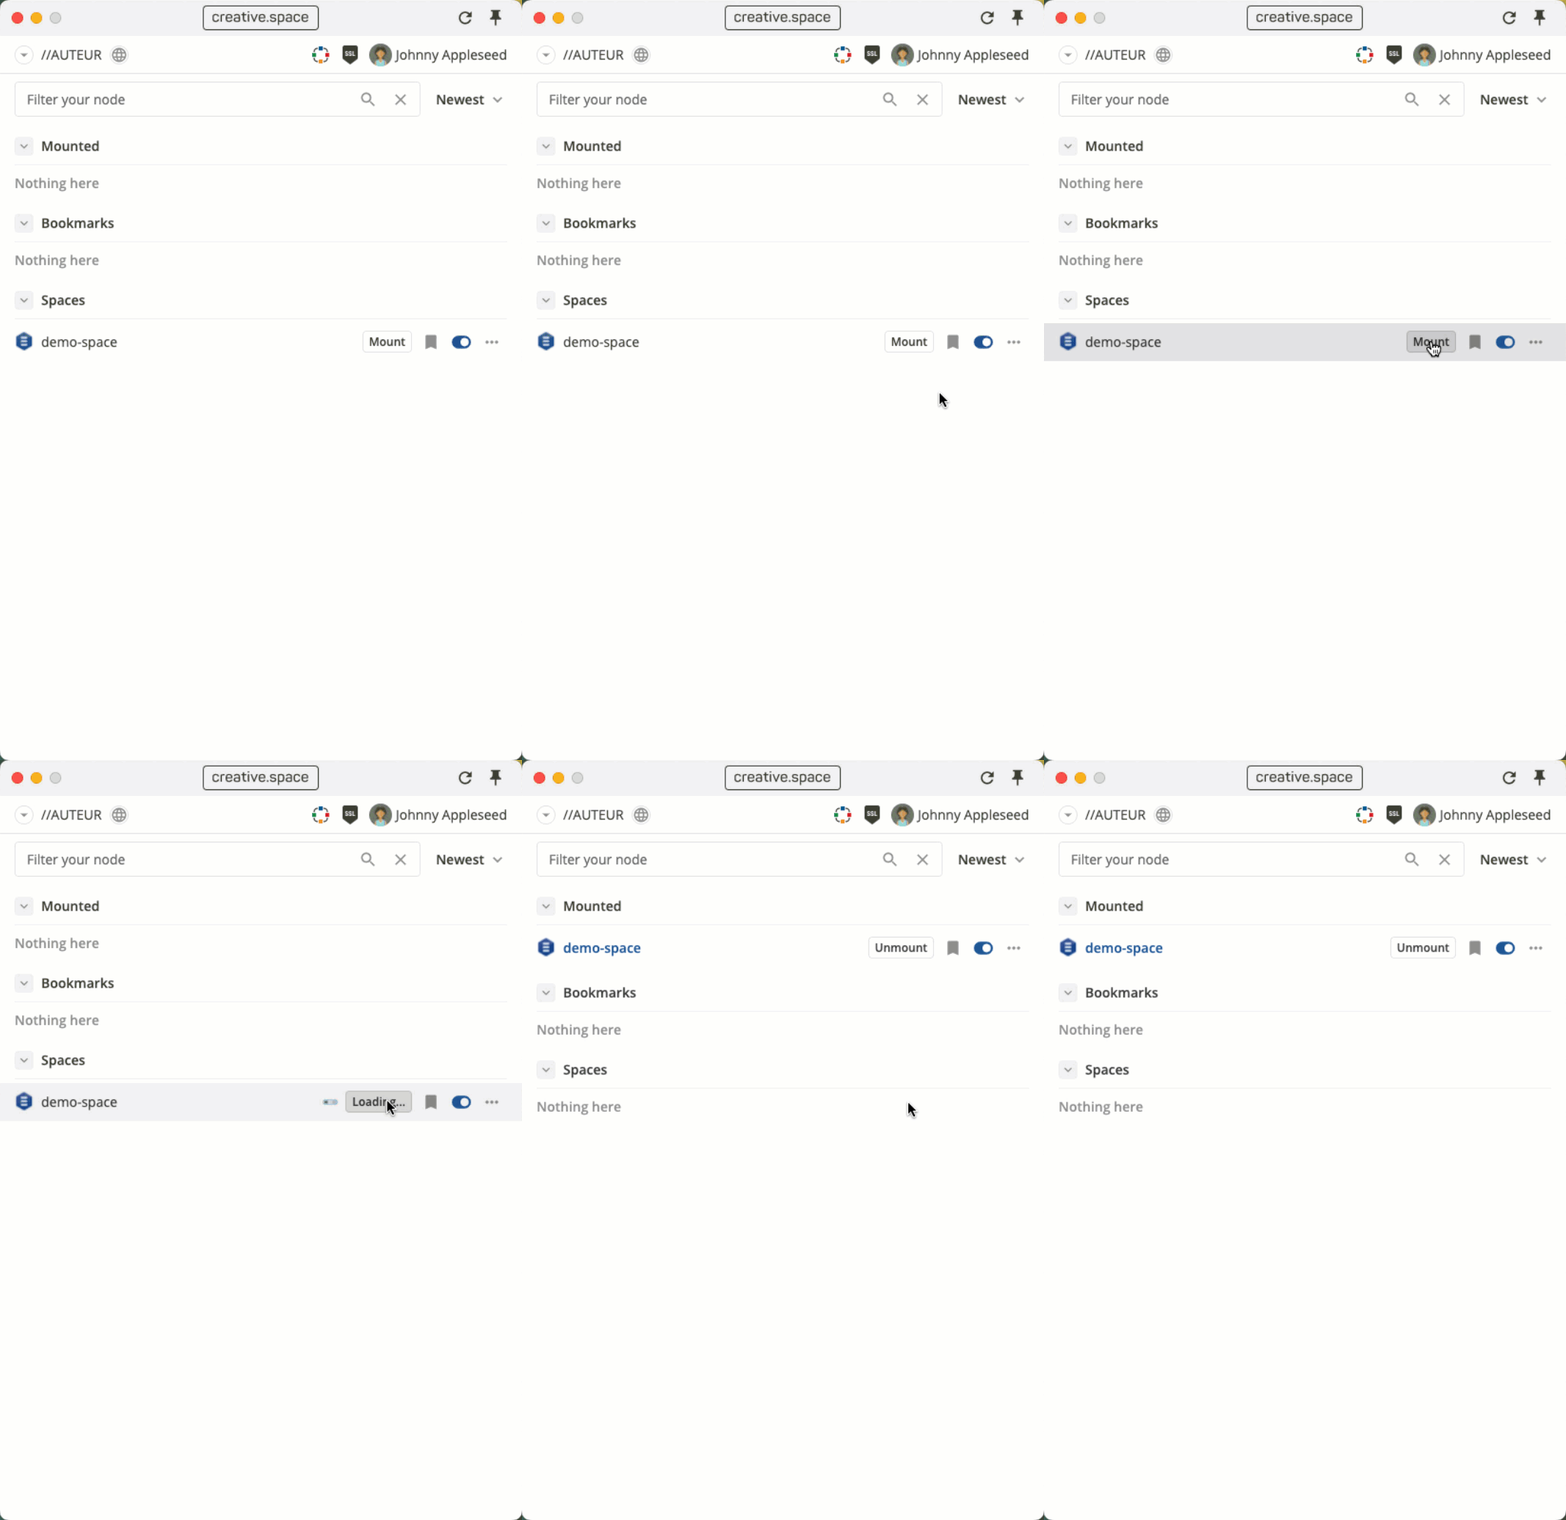
Consider this: Instead of each team member storing their own copy of assets on personal drives, shared spaces allow everyone on your team to access the same files, simultaneously. Imagine a massive library where all your project's materials are neatly cataloged and within everyone's reach. That's the power of network-attached storage with creative.space.
The benefits here are two-fold: Not only does this declutter individual workspaces, it also ensures that everyone is working from the same page, literally. When everyone accesses assets using the same file paths, it eliminates the need for relinking files, a process that can sometimes feel like an unruly game of hide and seek. With creative.space, you won't lose precious time tracking down files and can dedicate more time to being productive.
Now, let's take it a step further and think about remote work. With creative.space, even your team members who are halfway across the world can have access to these shared spaces via a VPN. They can tap into your media library just as easily as if they were in the office next door. So, why not give your team the ultimate boost in efficiency by storing your assets in shared spaces? This simple step can have a profound impact on your workflow, making your post-production process smooth, efficient, and truly collaborative.
Tip 2: Proxy Workflow with creative.space and Premiere Pro
Working with high-resolution source media is great, but it can present some unique challenges, especially for teams scattered around the globe. Enter the proxy workflow. It's the unsung hero of remote collaboration, turning potentially choppy playback into a smooth editing experience. With creative.space and Premiere Pro, you can make this superhero part of your team in no time.
Let's go back to basics for a moment. A proxy workflow means creating lower-resolution versions - 'proxies' - of your media files. These lighter, more agile versions ensure that all team members, no matter their location or connection speed, can edit efficiently and without interruption. When it's time for the final render and export, simply switch back to your high-resolution originals.
So, how do you integrate this workflow seamlessly with creative.space and Premiere Pro?
- Start by setting up a new Production or Project in Premiere Pro. Check the ingest box under Ingest Settings and opt for 'Create Proxies'.
- Choose a proxy preset suitable for your team's remote work situation. It's like selecting the right gear for a hike - you need to test different formats and resolutions to find the one that's going to give you the smoothest climb, based on your specific internet bandwidth.
- Designate a home for your proxies. Create a new folder specifically for these files, so there's no mix-up between your high-res originals and the proxy versions.
- Import your media using the Media Browser panel. Once you start the import process, Adobe Media Encoder swings into action, creating your proxies. It's as if you have your personal assembly line, diligently prepping your media while you focus on the larger creative vision.
- To work with these freshly minted proxies, enable 'toggle proxy' in your Premiere Pro project's program window. This allows you to switch between viewing the original media and proxy media as smoothly as changing a TV channel.
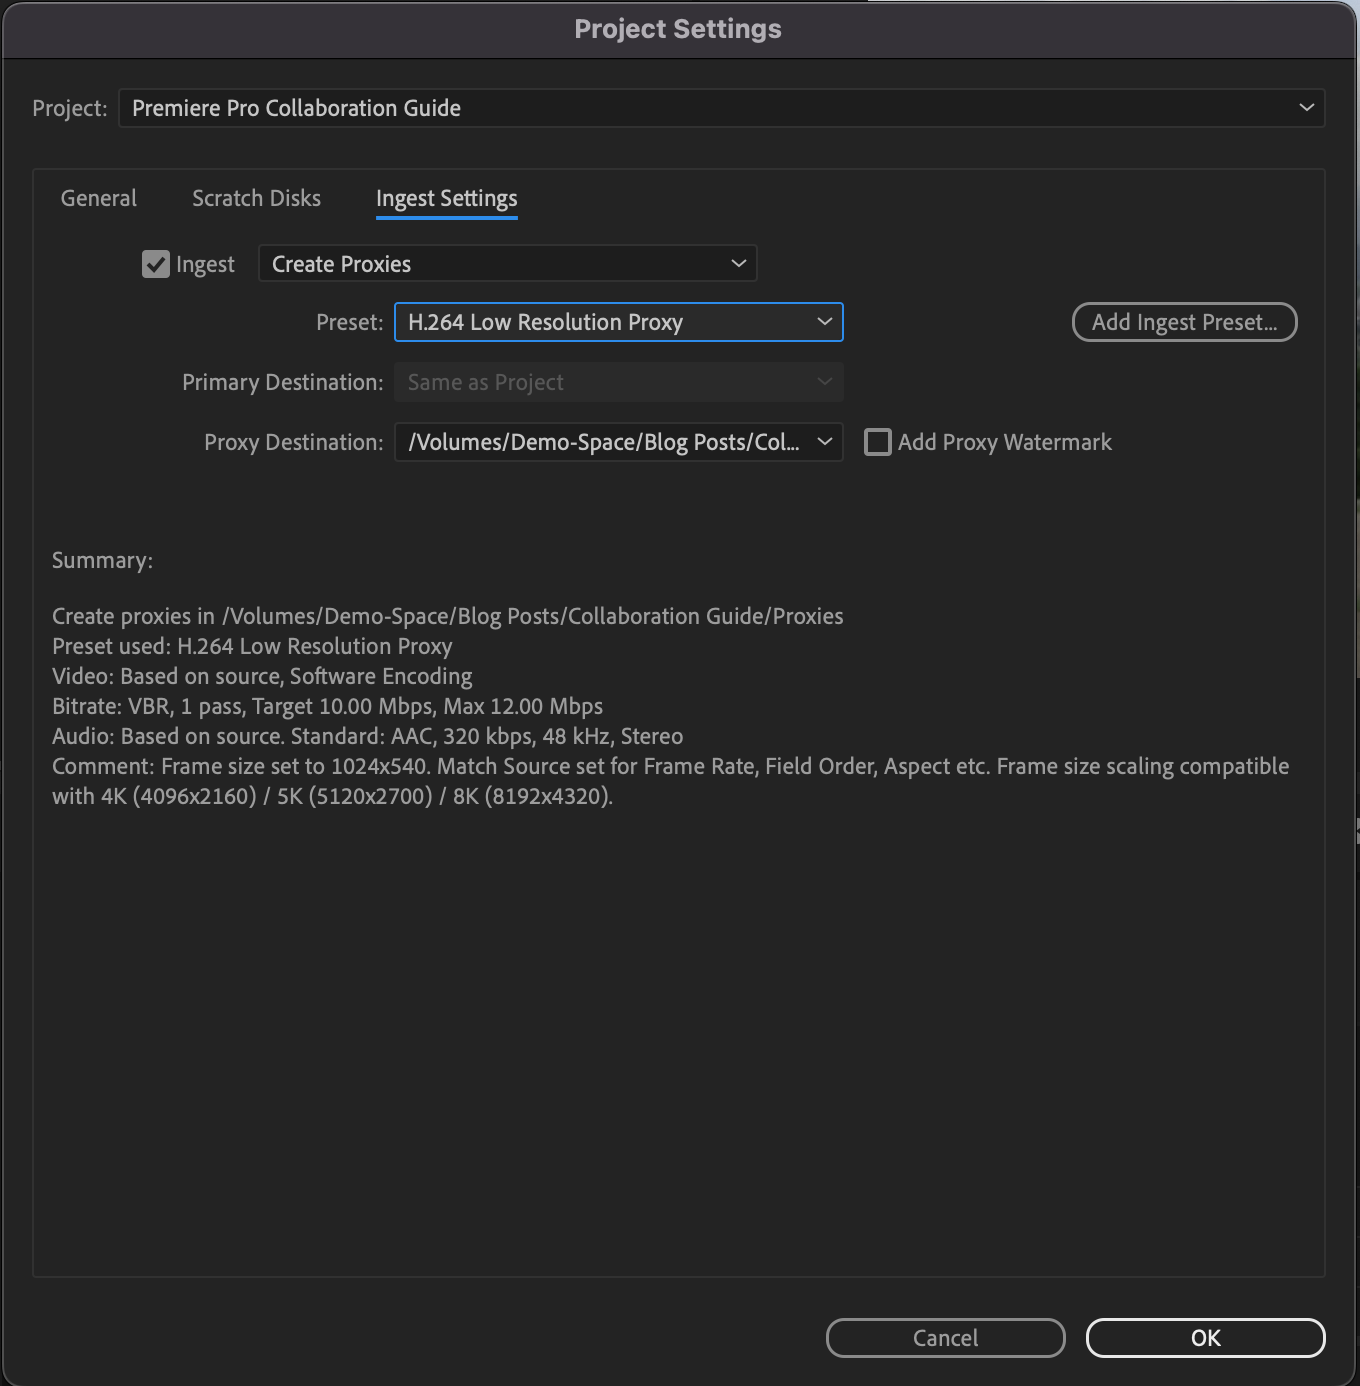
Your project is now primed with optimized proxies, ensuring all team members, both local and remote, can edit in harmony. Remote collaborators can edit with proxies, while on premises team members can handle the final render, either locally or by using a virtual desktop. It's like having your cake and eating it too, ensuring you have the ideal blend of collaboration, efficiency, and high-quality output.
Tip 3: Manage Project Files with creative.space
Have you ever spent hours searching for the latest version of a project file in a sea of emails or a maze of folders? Perhaps you've experienced that sinking feeling of realizing you've been working on an outdated version of a project file. Let's wave goodbye to those headaches and say hello to seamless project management with creative.space.
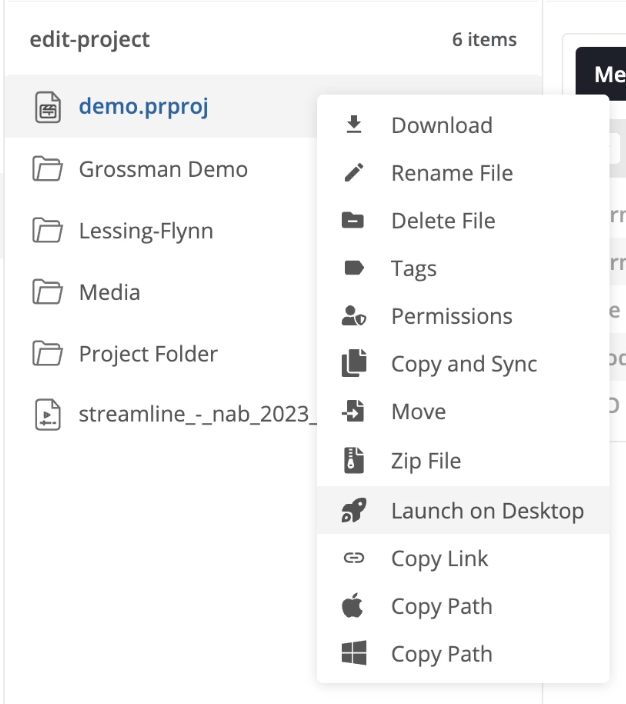
With creative.space, you're not just getting a storage solution, but a powerful sharing tool. The beauty of this system lies in its intuitive Web App, which offers a "Launch on Desktop" feature. This allows you to share links to project files stored in shared spaces, making accessing project files as easy as opening a link and clicking a button.
Here's how it works:
- Store your project files in the creative.space shared spaces.
- Use the creative.space Web App to share links to these files. You can share these links via email, chat, or any other communication tool you use with your team. This eliminates the confusion of multiple versions of the same file circulating among your team members.
- By clicking the “Launch on Desktop” button, the project file opens directly in Premiere Pro on your team member's workstation. They can start working immediately, no time wasted on finding or downloading files.
Remember, these aren't just static links. Any updates made to the project file are reflected in real-time. So your team always has the latest version at their fingertips, eliminating versioning chaos and ensuring everyone is on the same page.
In essence, creative.space is like having a well-organized digital project manager on your team. By managing project files with creative.space, you're not only enhancing your Premiere Pro workflow but creating a well-oiled machine where everyone has access to what they need when they need it.
Tip 4: Enable Project Locking
Project Locking ensures that while multiple users can open the same project, only one user can make changes at a time, locking the project for others. This prevents overwriting of edits, ensuring that everyone's hard work is preserved and that different versions don’t clash in a messy tango.
Here’s how it works in Premiere Pro on creative.space:
- Go to your Premiere Pro settings or preferences. On Windows, head over to Edit, then Preferences, and then Collaboration. If you're using a Mac, go to Premiere Pro, then Preferences, and finally, Collaboration.
- Check the 'Enable Project Locking' option and remember to put your name in the 'User Name' field. This way, when you're working on a project, your teammates will see that you're the maestro conducting the editing symphony.
- As soon as you open a project, it's locked for you, and other users see it as read-only. It’s as if you've drawn an invisible boundary around your creative space, keeping your project secure while you work your magic.

With Project Locking enabled, your team members can still access the project in read-only mode. They can explore, but they can't meddle with the masterpiece you're working on. Once you've finished your edits, just close the project, and it's unlocked for others to dive in and contribute their part.
Think of it as passing the baton in a relay race - seamless, organized, and fair. Every collaborator gets their chance to shine, knowing they're contributing to a harmonious end product.
Tip 5: Leverage Productions for Multi-User Collaboration
Have you ever been part of a team working on a big project, with everyone trying to edit the same project file? You're constantly waiting for your turn to access the file, causing frustration, delays, and a whole lot of inefficiency.
This is where the Productions feature in Adobe Premiere Pro comes to the rescue! Essentially, a Production is a parent folder that houses multiple Premiere Pro project files, all sharing the same settings. This setup allows sequences in different projects to reference the same media files without creating any duplicates – significantly decluttering your workspace and streamlining your workflows.
Setting up a Production is as simple as selecting File > New > Production and designating your creative.space server as the storage path. Now you have a collaborative hub where multiple project files can live together in perfect harmony.
Productions are flexible by design. They allow you to break down large projects into smaller, more manageable parts, improving load times and speeding up the saving process. You can also organize the projects in folders. When you save your Production on a local or shared storage system like creative.space, you and your team can work without the need for a constant internet connection or a specific Creative Cloud license.
While Productions is highly customizable and you should definitely tailor it to your team's unique needs, there are some tried-and-true methods we've seen that really boost efficiency and foster a harmonious collaborative environment.
We suggest creating folders for managing two primary types of projects within your Production - 'Media projects' and 'Sequence projects'.
Consider 'Media projects' as your common pool of resources - a grand reservoir where all media assets like raw footage, audio files, graphics, and more reside. This structure allows every team member to draw from the same wellspring of materials, avoiding confusion over asset versions or unnecessary duplication of files. This isn't just an organizational tool; it's the lifeblood of your project, feeding every sequence with the necessary media.
On the other hand, 'Sequence projects' act as individual workspaces for each editor. This is where they construct sequences, make edits, and flex their creative muscles. These projects tap into the resources stored in the Media projects, but they don't need to house any of these files themselves. This means less clutter, less confusion, and a more streamlined editing process.
One of the great benefits of separating 'Media projects' and 'Sequence projects' lies in how Adobe's project locking mechanism functions. When an editor is working on their sequence within their dedicated 'Sequence project', that project is locked to other users, preventing any accidental overwrites or changes. However, the beauty is that these 'locked' projects can still be accessed by other team members in a read-only mode.
This allows your collaborators to seamlessly pull sequences and content from other 'Sequence projects' into their own workspace without disturbing the original. It's like being able to borrow the best parts of your teammate's toolkit without ever risking misplacing or damaging their tools.
Now, you might be wondering - "What if I need to access media from 'Media projects', but I don't want to open those massive project files?" Enter the role of 'Selects'. In the world of post-production, 'Selects' are sequences that contain chosen shots or clips deemed useful or noteworthy.
Think of 'Selects' as the highlights reel of your 'Media projects'. By including 'Selects' sequences in each 'Media project', you can provide easy, quick access to the project's key assets. Team members can then pull these 'Selects' into their 'Sequence projects', avoiding the need to sift through the entirety of 'Media projects'. This saves time, preserves system resources, and keeps the editing process running smoothly. This way, your team can focus on what they do best - creating stunning content.
Remember, these are just recommendations. The strength of Productions lies in its flexibility and its capacity to adapt to your needs. So, feel free to shuffle, rearrange, and organize your projects in a way that suits your team best. The goal is seamless, efficient collaboration. With the power of Productions and creative.space, you hold the key to unlock this potential.
Tip 6: Cache to a Local SSD
While shared media storage is a major plus, Adobe recommends keeping your Media Cache Files and Media Cache Database on the system boot drive or on a separate fast SSD attached to each workstation. So, remember not to place these on shared storage.
To optimize Premiere Pro for creative.space, you need to check your current cache location. On Windows, navigate to Edit > Preferences > Media Cache. For MacOS, go to Premiere Pro > Preferences > Media Cache.
And remember, don't let those cache files pile up too high - regularly clear them out to keep your drive healthy and ensure peak performance. This small adjustment can make a world of difference in how efficiently you and your team can work, especially in a shared environment.
Tip 7: Use Background Auto-Save and Snapshots to Recover Old Project Versions
When it comes to version recovery, Adobe Premiere Pro's Background Auto Save feature and creative.space's ZFS Snapshots function in harmony to create an efficient, automated, and robust system. This ensures that you have the resources at hand to retrieve previous versions of your project, should the need arise.
Adobe Premiere Pro's Background Auto Save quietly operates in the background, making regular saves of your project without interrupting your workflow. You can set the frequency of auto-saves from once per minute to every 99 minutes. Each auto-save creates a backup copy of your project, which can be stored in a predefined Auto Save folder. You can also specify the maximum number of project versions to retain, with the upper limit set at 1000.
On the other hand, creative.space's ZFS Snapshots work slightly differently. A Snapshot, in this context, captures the exact state of your project at a particular point in time and preserves it. You can consider Snapshots as your project's time machine, enabling you to revisit the project as it existed at the time of the Snapshot. Navigating and recovering files from your Snapshots is made effortless using creative.space's Snapshot Browser.
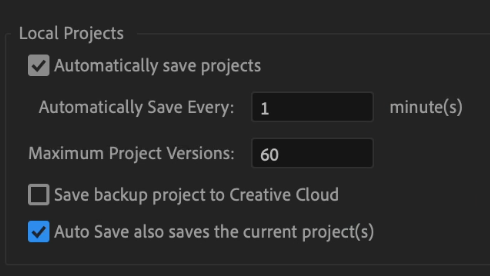
To maximize the benefits of these features, we recommend setting your Background Auto Save to save every minute and retain 60 versions. This ensures that you have a backup of your project at every minute for the last hour.
To maximize the benefits of these features, we recommend setting your Background Auto Save to save every minute and retain 60 versions. This ensures that you have a backup of your project at every minute for the last hour.
- Open Adobe Premiere Pro and load your project.
- Go to the menu bar at the top. If you're using Windows, click on Edit, then select Preferences from the dropdown menu. If you're using MacOS, click on Premiere Pro, then select Preferences from the dropdown menu.
- From the list on the left side, select Auto Save.
- In the Auto Save window, you'll see options to adjust the frequency of auto saves and the maximum number of versions to keep.
- Set Automatically Save Every to 1 minute. This will ensure that a version of your project is saved every minute.
- Set Maximum Project Versions to 60. This will retain the last 60 versions of your project, covering an hour of work if your project is auto-saving every minute.
- Make sure Auto Save also saves the current project(s) is checked. This will ensure that in addition to creating a new backup, your current project file also gets saved during an auto-save.
- Review the location where your auto-saved projects are stored under in your Project Settings: It's recommended to set them to “Same as Project” to make it easy to find and ensure they are included in Snapshots.
- Click OK to apply the changes and close the Preferences dialog box.

We also recommend employing a strategy we call 'Rolling Snapshots'. This involves scheduling a task in creative.space to take a Snapshot every hour, and then set to expire after 24 hours. In effect, you have an hourly backup of your project spanning the last day, managed entirely automatically.
- On the System page, click the gear icon next to the space you would like to schedule snapshots for.
- Click ‘Take New Snapshot’.
- Under ‘Expire In’ select ‘Custom Days’ and then type ‘1’
- Enter a name for your Snapshot Schedule task
- Select ‘Hourly’ to take a Snapshot once every hour
- Select a date and time to start taking Snapshots, which should be on the hour to align with Premiere Pro’s Background Auto Saves
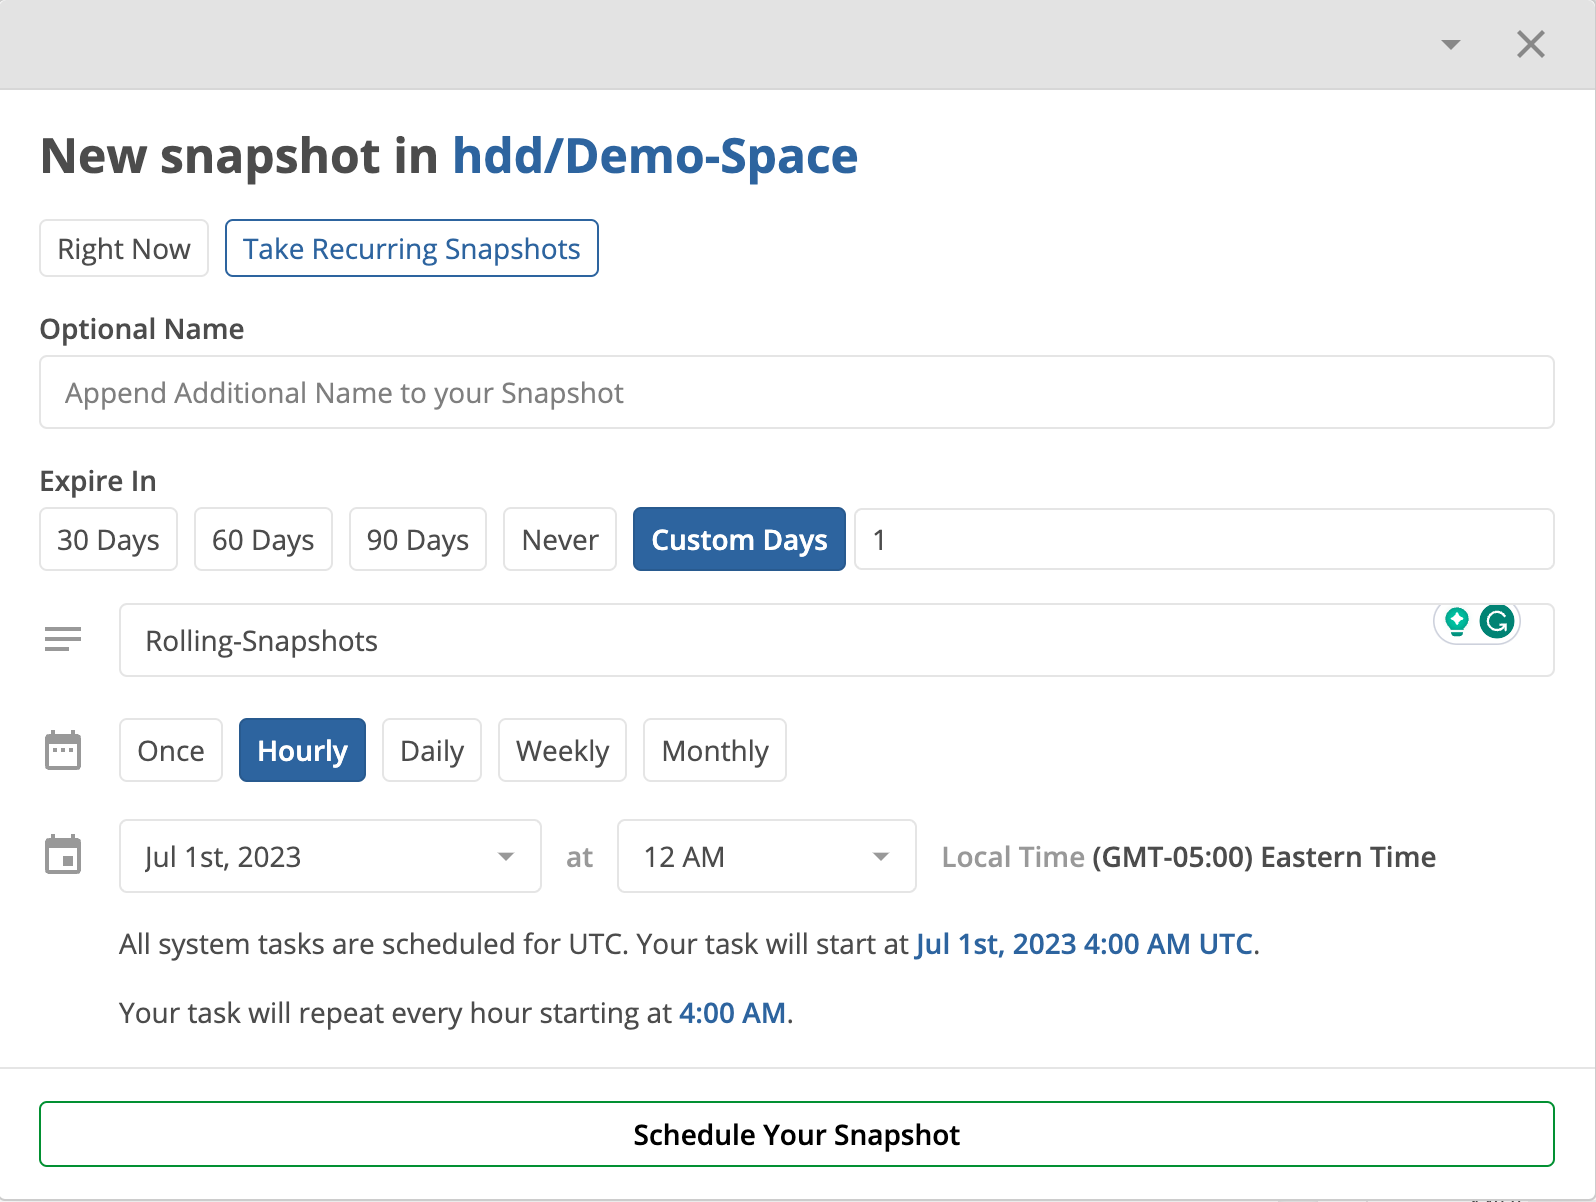
By aligning these settings, you create a self-sustaining version recovery system. With Background Auto Save capturing each minute of your project's progress, and Rolling Snapshots providing an hourly project backup for a day, you can rest easy knowing that your ability to restore old project versions is well catered for.
The amalgamation of creative.space's ZFS Snapshots and Adobe's Background Auto Save equips you fully to handle any versioning requirements, freeing you to focus more on your creative process and less on version management.
Conclusion
And there you have it - seven transformative tips to power up your Premiere Pro workflows with creative.space. From setting up shared spaces to integrating proxy workflows, managing project files, leveraging Productions for collaborative efforts, caching to a local SSD, and maximizing the power of Background Auto Save and ZFS Snapshots, you now have the insights to create a well-oiled creative machine.
These tips aren't just about improving the technical aspects of your work; they're about fostering a harmonious, efficient, and creative environment for your team. It's about eliminating the roadblocks that impede creativity and creating a workspace where your team can do what they do best - create.
Whether you're a small creative team or a large media house, these tips apply across the board. The goal here is to make the complex simple, the unmanageable manageable, and the chaotic organized. By integrating creative.space into your Premiere Pro workflows, you're stepping into a world of streamlined processes, improved productivity, and limitless creativity.
Remember, the beauty of creative.space lies in its adaptability. These aren't strict rules to follow, but guidelines that you can tweak, tailor, and optimize to suit your team's unique needs. So, experiment, explore, and create your ideal workflow.
The future of post-production is here. It's collaborative, it's efficient, it's creative. It's creative.space. So, what are you waiting for? Dive in, and let the creativity flow.


